mcottondesign

Loving Open-Souce One Anonymous Function at a Time.

Making Python use all those Cores and RAM

It is cheap and easy to build a machine with 8/16 cores and 32GB of RAM. It is more complicated to make Python use all those resources. This blog post will go through strategies to use all the CPU, RAM, and the speed of your storage device.

I am using the AMD 3700x from my previous post. It has 8 cores and 16 threads. For this post I will be treating it each thread as a core because that is how Ubuntu displays it in System Monitor.

Looping through a of directory of 4 million images and doing inference on them one by one is slow. Most of time is waiting on system IO. Loading the image from disk into RAM is slow. Transforming the image once it is in RAM is very fast and making an inference with the GPU is also fast. In that case Python will only be using 1/16th of the available total processing power and only that single images will be stored in RAM. Using a SSD or NVME device instead of a traditional hard drive does speed it up, but not enough.


Loading images into RAM is great but you will run out at some point so it is best to lazy load them. In this case I wrote a quick generator function that takes an argument of the batch size it should load.


Dealing with a batch of images is better than loading them individually but they still need to be pre-processed by the CPU and placed in a queue. This is slow when the CPU is only apple to use 1/16th of its abilities.


Using the included multiprocessing package you can easily create a bunch of processes and use a queue to shuffle data between them. It also includes the ability to create a pool of processes to make it even more straight forward.

In my own testing, my HDD was still slowing down the system because it wasn't able to keep all of the CPU processes busy. I was only able to utilize ~75% of my CPU when loading from a 7200RPM HDD. For testing purposes I loaded up a batch on my NVME drive and it easily exceed the CPUs ability to process them. Only having a single NVME drive I will need to wait for prices to come down before I can convert all of my storage over to ultra-fast flash.

Using the above code you can easily max out your RAM and CPU. Doing this for batches of images means that there is always a supply of images in RAM for the GPU to consume. It also means that going through those 4 million images won't take longer than needed. Next challenge is to speed up GPU inference.

Building an AI/ML workstation in 2020

The cloud is a great way to get started with AI/ML. The going rate is around $4/hr for a GPU instance. It might be all that you need, but if you need to maximize your personal hardware buget this is my guide to buiding workstation.

Price

I spent ~$1000 and you could get it even lower with the current deals. I decided on a AMD Ryzen 3700X, Nvidia 2060 Super, 32GB of RAM, and an NVME drive. I could connect all of this into a B450m motherboard so I didn't see any reason to spend more. I also include another SSD for Windows 10 and two HDDs for storing datasets.

CPU

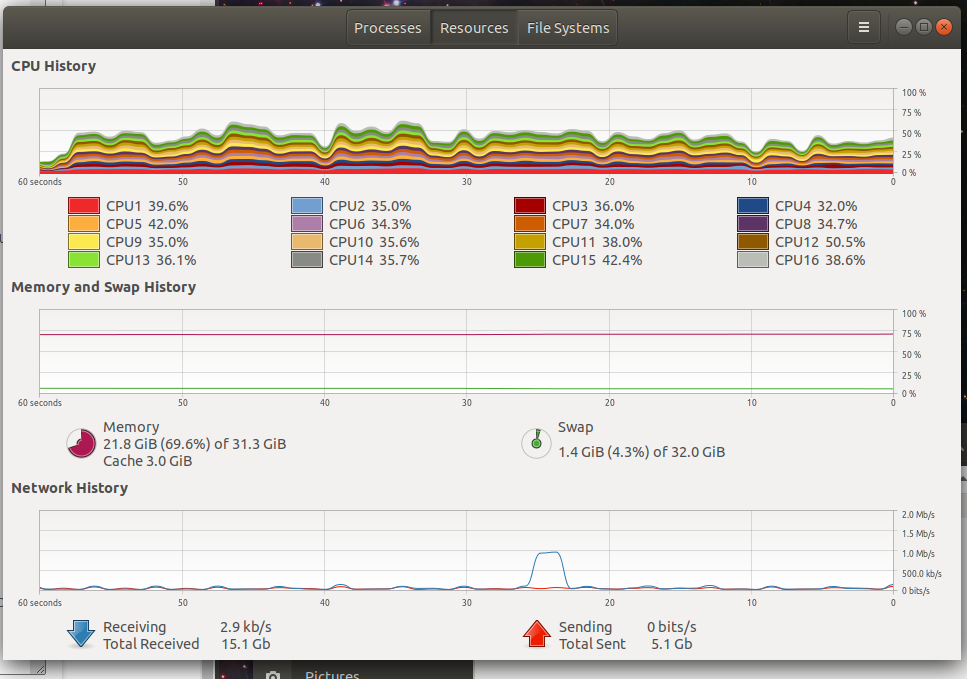
The Ryzen 3700x is far more than I need and most of the time several cores are idle. Because most of my tooling is in python it is a real struggle to make use of the resources. The multiprocess library is great and it isn't too complicated to make a Pool of CPU cores for the program to use.

GPU

The 2060 Super is in a very odd position in the current lineup. It is the cheapest model with 8GB of VRAM, to get 3GB more you have to 3x the price. It makes more sense to jump up to 24GB for 6x the price. Training CNN models on image data requires significant amounts of VRAM. You could spend more but without more VRAM the money would only provide marginal improvements due to the number of CUDA cores.

RAM

System memory is very similar to CPU cores, you will rarely max it out but it never hurts to have more available. I typically am using 20GB which means that I could reduce my batch size and be done with 16GB or I could just spend the extra $80 to get 32GB.

STORAGE

I'm using a 1TB NVME drive. It is very fast and tucks away nicely on the motherboard. It is overkill for my needs but it is nice to have the space to store millions of images and not wait on traditional HDDs.

Speaking of HDDs. I have two, a 1TB and a 2TB. The 1TB is just for datasets and so that I can keep space available on the faster drive. The second drive is for automatic backsups of the main disk and datasets. Backups are also doing to two different NASs but that is another blog post.

It would be a shame to have this machine and not play games on it. I'm using an inexpensive 1TB SSD for Windows 10. I don't like dual booting off of a single drive. I prefer using the bios boot selector to switch between OSes.

COOLING

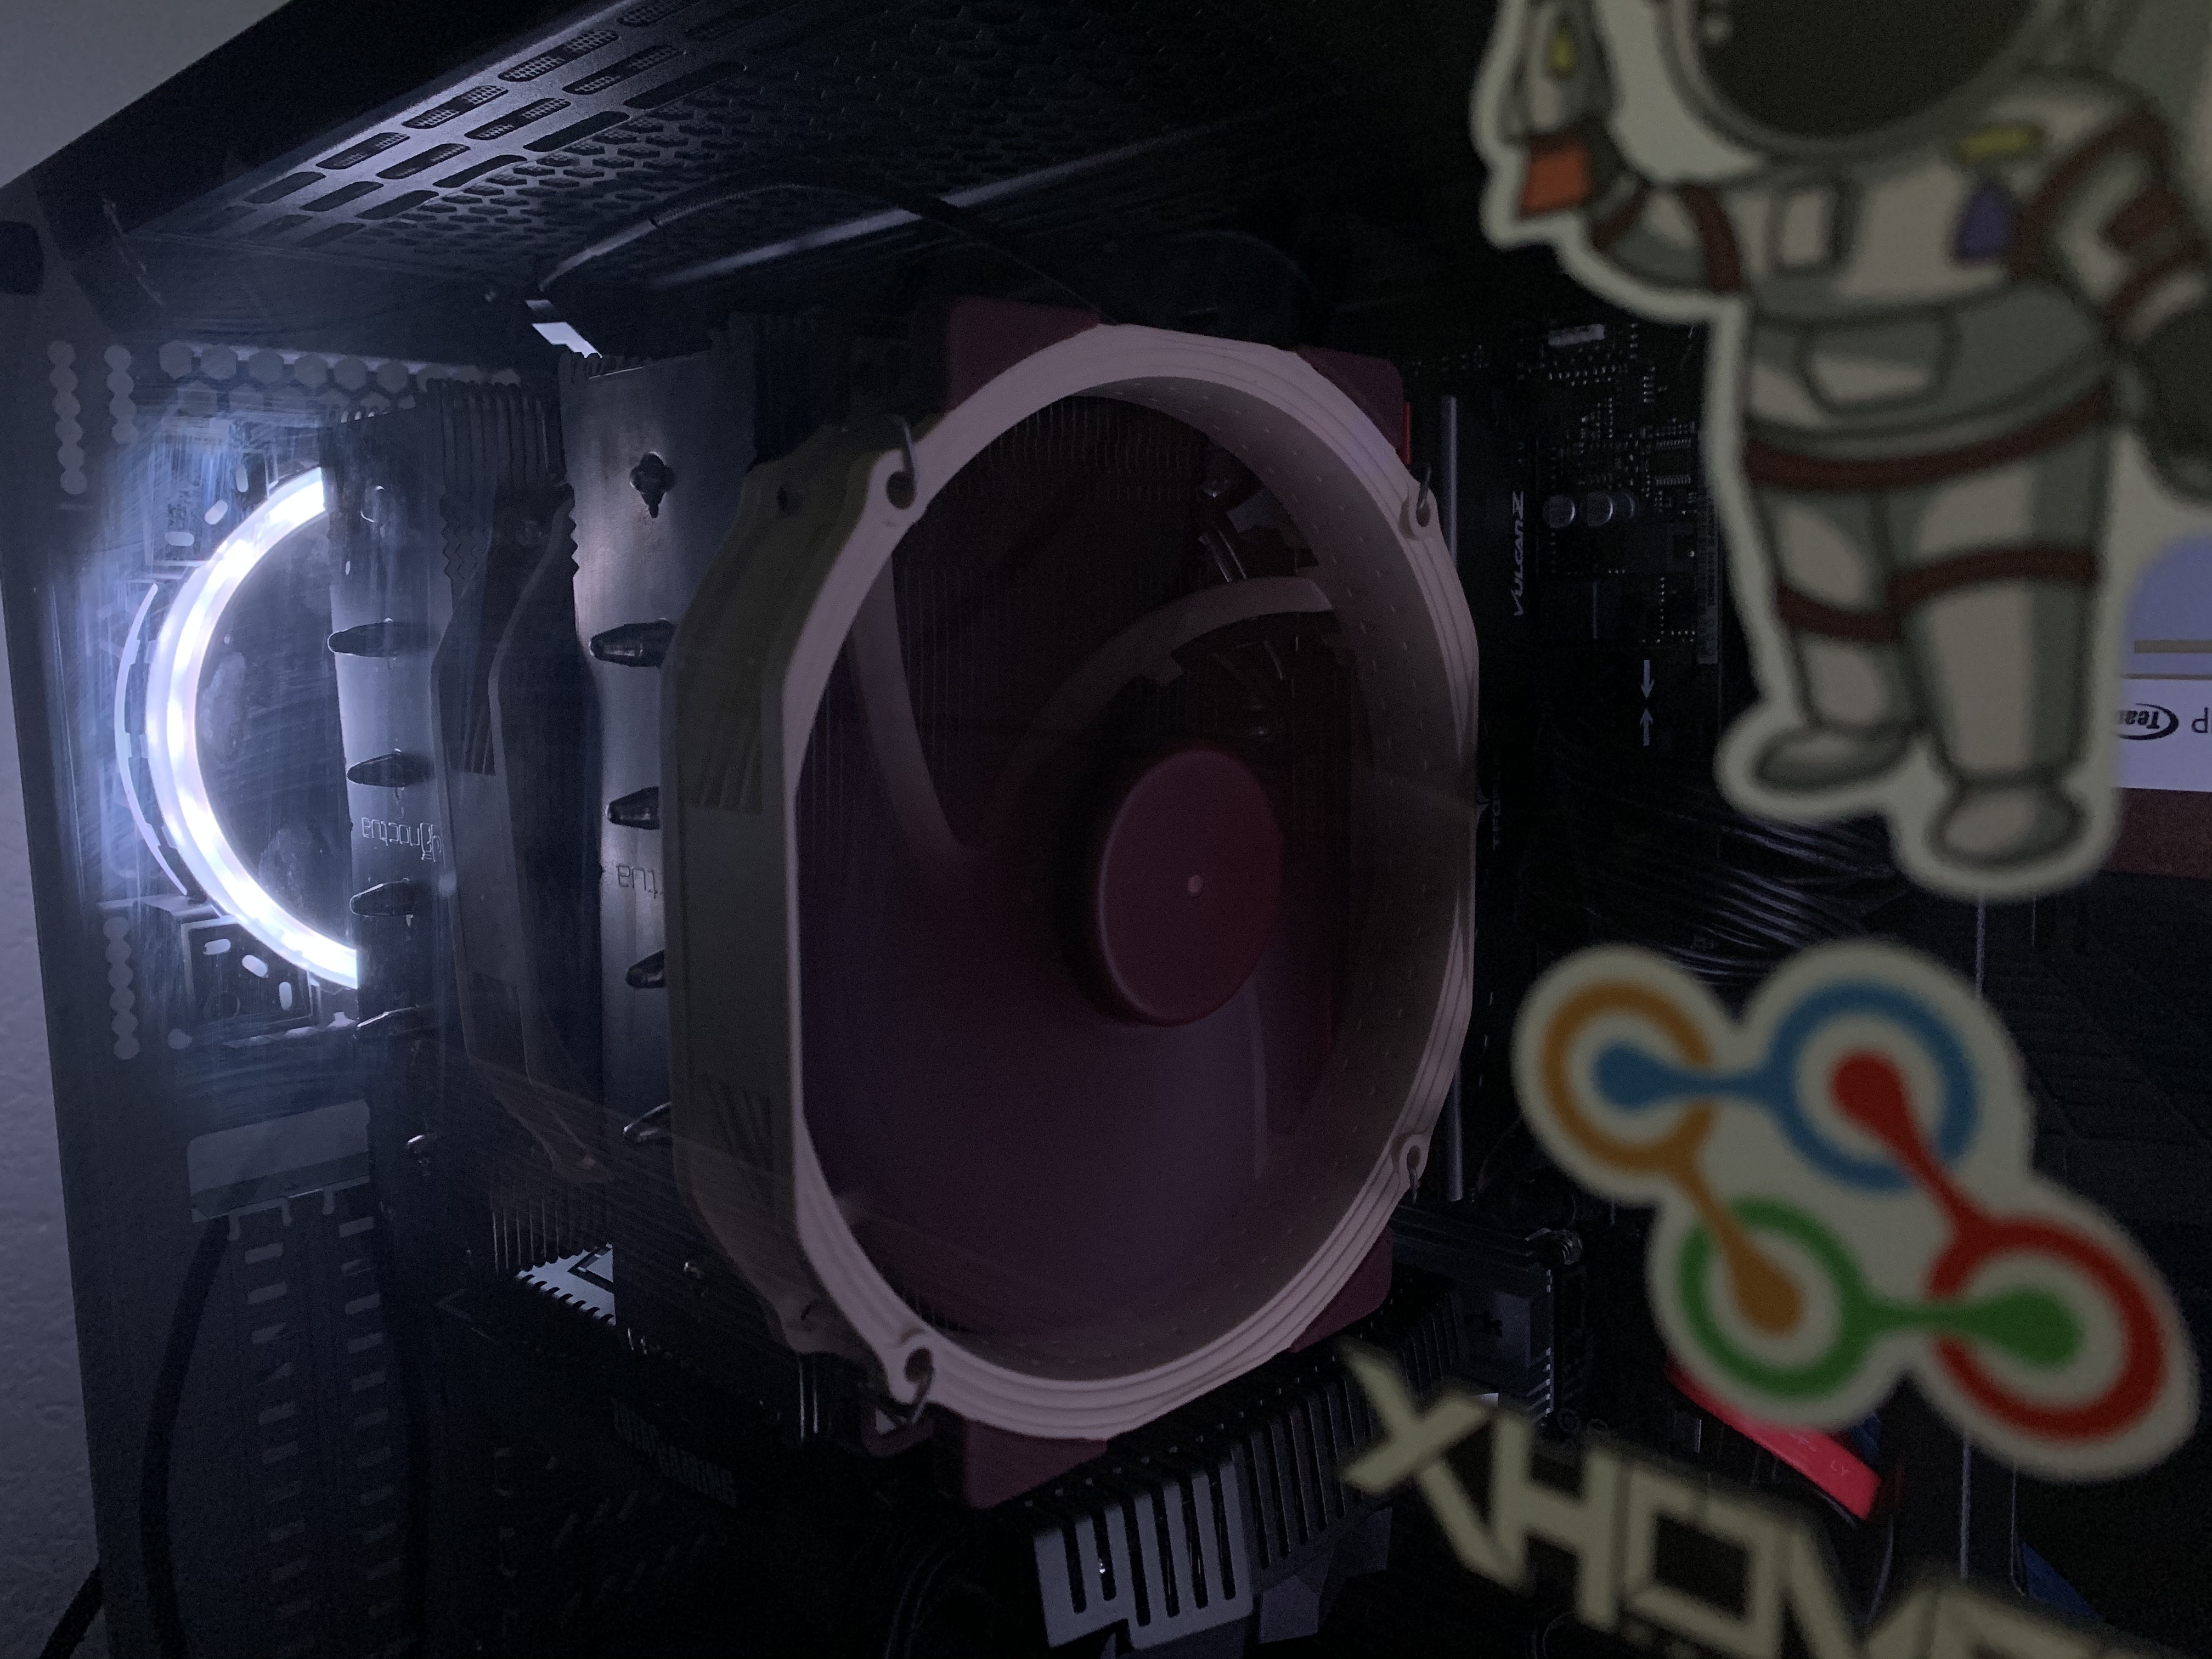
The case I'm using has four 120mm fans. I added a giant Nactua heat sink with two additional 140mm fans. Adjust the motherboard fan curves so that everything is nice and quiet. I believe in having a lot of airflow and I haven't had any temperature problems (inside the case, the damn thing very noticably heats up my office).

UPGRADES

I'm currently happy with the way it is. The obvious upgrade will be for more GPU VRAM. I decided against water-cooling but if I get to a place with multiple GPUs that appears to be the best solution.

Leaving Eagle Eye and moving to HUVRdata

I am excited to announce that I have accepted a new position with HUVRDATA. After an eight week transition I am thrilled to get started. I wI'll be their CTO and will guide them into becoming the leader in drone based inspections.

It was surprisingly hard to leave Eagle Eye and specifically, let the team know what was next for me. I lost sleep over this decision but we were able to make it through. I loved working with them and it was filled with great memories.

I've been working with Bob and Ben at HUVR since the start of the year. Things really kicked into gear when they closed a funding round in August. Right now it is time to mash the accelerator and I would have regretted letting them go on without me. This is an area I am very passionate about, have the skills to do it, and am fully on-board to make this successful.

Talk at Austin Python Meetup 8/14

I had a lot of fun speaking at the Austin Python Meetup. My presentation was on the current options available to those who want use python with embedded hardware. It was a great group of people and I got the chance to bring some toys.

Presentation is here

Using animated GIFs to answer support questions

Videos are great at demonstrating a feature, but they are a slow and clunky experience. Animated GIFs are quick and lightweight, and no voice narration. I used Licecap to capture these videos. Embedding them is as easy as an img tag

How do I add a bridge?

How do I add a camera?

How do I get to camera settings?

How do I change camera resolution?

How do I view cameras?

How do I create a layout?

How do I resize a layout?

First Demo of my RFID integration

In order to show off the EEN API I made an example access control system out of a Raspberry PI, RFID reader and Node.js

Node.js was a natural fit for this project because of how easy it is to handle events from the RFID reader, add realtime support through websockets and pull data out of Eagle Eye Networks with the een module.

All the important changes can be made from config.js in the root directory. From there you can define badges and doors. Each door has its own reader which is defined by the serial port it is connected to. The doors define the rules of which badges are authorized to open. Adding time checks would be trivial to extend.

On startup it opens the serial ports and begins listening for strings that match the know badge format. Next, it starts a webserver and waits for a websocket connection from a client. Once the client connects it sends the current state to allow the client to get in sync.

New events are realtime, the template is rendered on the client to keep server traffic down. The timestamp is recorded and a preview image is fetched. The internal webserver acts as a authentication proxy for images and videos. The image and video link could then be saved for further processing.

You can find the project on github here: node-rfid

Working with the API: getting previews

Introduction

This blog post is an example of how you can use the Eagle Eye Networks API to embed the preview stream where ever you want.

Background

The API makes it very easy to get the preview stream for all the cameras in an account. The preview stream is a series of JPEG images and requires authentication. Our code today will show how to use the API to provide the images on a webpage without authentication.

Step 1:

We are going to use the code at mcotton/watcher to run a Node.js server that will login, subscribe to the poll stream, notify the client and proxy the image requests. We could remove the poll stream to make the example very basic but it is worth going through it now.

Download or clone the git repository.

Step 2:

You will need to have Node.js installed (current version is v0.10.26). Once it is installed, open up the command line in the same directory as the example code, you can install the dependencies by running

npm install

Edit the file named config.js, replace 'your_username' and 'your_password' with your username and password

module.exports = {
    username   =       'your_username',
    password   =       'your_password'
}

Save the file and start the server

npm start

Step 3:

You can now open a browser at go to localhost:3000 and you will see previews show up as the become available on the server.

Because we are subscribed to the poll stream we are only fetching previews when they are available. This makes it very efficient with the bandwidth.

Conclusion:

You can now treat the image URLs just like static assets on your server. You can put it behind your own firewall or you can make it publicly available. In both cases your username and password are safely stored on the server and never sent to the client.

Making a wireless security system

Our condo recently had some flood damaged and their are workers coming in and out to do repairs. My wife and I both work and do not feel comfortable with strangers in our house without us. We don't have the needed wiring in our hallway and my wife didn't want to see any wires run down the wall. So I made a wired camera wireless with parts I had laying around.

First I needed a wireless to wired bridge. There are several specialty parts available that do this but one of the cheapest and easiest to use is the Apple Airport Express. When you join it to a wireless networks, the ethernet port becomes a LAN port.
Airport Express

I also had an older Axis M1011 wired camera. Any IP camera will work through the wireless bridge, but make sure you have a way to power it.

Axis M1011

You can use the Axis clamp bracket and the power supply to power and mount the unit. Plug it all in and it will work just as if it were wired.
finished back view

finished front view

finished front view

Single Page App

Want to test your server code but you inherited a code base without tests? Can't justify spending weeks writing test? Want to prove that your API is working? Need to debug the iPhone client but don't want to open XCode.

HTML5 to the rescue!

Yay for JavaScript

You can jump around location using the links along the top. You can login with your Qliq login.

Qliq webapp

the source is on github

Making Python and Django more social with awe.sm

Our users like to share the deal they just received with their friends on Facebook. We would like to know how well those links do and what kind of traffic they receive. awe.sm is a company that does exactly that. This blog post is about showing how easy it is to integrate into python and Django.

def facebook_share_checkin(checkin, points):
    try:
        # I removed the code for getting the user token
        graph = facebook.GraphAPI(token)

        # The facebook API specifies what they want as a payload
        attachment = dict()
        attachment['picture'] = consts.LOGO
        attachment['name'] = checkin.location.name
        msg = 'I just checked in at %s using Qliq' % checkin.location.name
        attachment['link'] = consts.SOCIAL_NETWORK_DEFAULT_LINK

        # Post it the the user's wall
        graph.put_wall_post(msg, attachment)

    except facebook.GraphAPIError as e:
        logger.exception('GraphAPIError')
    except SocialNetworkCredentials.DoesNotExist:
        logger.exception('Facebook credentials error')

This is real standard and nothing exciting. The link we are sharing is the same for every user and comes from a file of constants.

attachment['link'] = consts.SOCIAL_NETWORK_DEFAULT_LINK

Here is how we would use awe.sm to create a custom link per user and see how well that link does in the real world.

Just above the previous line we will make a network request to awe.sm with 5 parameters

- v: this is ther version of the api we will be using
- url: this is our original url we were using
- key: this is our developer key
- tool: this is the id of the tool we are using
- channel: this is going to be `facebook-post`

Now we just need to make the request and using the great python requests library

      r = requests.post('http://api.awe.sm/url.txt', 
          { 'v': 3, 
            'url': 'http://mcottondesign.com', 
            'key': '5c8b1a212434c2153c2f2c2f2c765a36140add243bf6eae876345f8fd11045d9', 
            'tool': 'mKU7un', 
            'channel': 'facebook-post'})

          attachment['link'] = r.body

So after everything is all buttoned up, this is what our final code looks like.

def facebook_share_checkin(checkin, points):
    try:
        # I remove the code for getting the user token
        graph = facebook.GraphAPI(token)

        # The facebook API specifies what they want as a payload
        attachment = dict()
        attachment['picture'] = consts.SOCIAL_NETWORK_QLIQ_LOGO
        attachment['name'] = checkin.location.name
        msg = 'I just checked in at %s using Qliq' % checkin.location.name
        r = requests.post('http://api.awe.sm/url.txt', 
            { 'v': 3, 
              'url': 'http://mcottondesign.com', 
              'key': '5c8b1a212434c2153c2f2c2f2c765a36140add243bf6eae876345f8fd11045d9', 
              'tool': 'mKU7un', 
              'channel': 'facebook-post'})

        if r.headers['status'] == '200':
            attachment['link'] = r.content
        else:
            attachment['link'] = consts.SOCIAL_NETWORK_DEFAULT_LINK

        # Post it the the user's wall
        graph.put_wall_post(msg, attachment)

    except facebook.GraphAPIError as e:
        logger.exception('GraphAPIError')
    except SocialNetworkCredentials.DoesNotExist:
        logger.exception('Facebook credentials error')

My new TestRunner

I am trying to get some test for our code base that doesn't have any. None at all. There isn't even a documented test plan.

Because the API server is the core of our porduct, and because testing RESTful things is easier, we'll start by making a JavaScript tester. And because a webpage is friendlier that a command-line, it'll report in the browser.

https://github.com/mcotton/TestRunner

And because a working webapp is even better documentation than a simple test suite.

https://github.com/mcotton/webapp

In an afternoon's worth of work I made a testrunner and in the off-hours over a couple days I made the webapp. Happy testing for everyone.

Making profile pages more sane

We encourage our merchants to include a facebook page with their profiles so that users can share that page when they check-in, check-out, unlock a deal, or redeem a deal. But some people didn't understand what that means and we had all sorts of crazy input. Instead of explaining the steps they'll need to get us the correct URL, we'll just take whatever they mashed out on their keyboard and fix it.

Django has some weird points, but it mostly has awesome ones. I needed to clean up our database and the interactive console was perfect.

python manage.py shell

and then you can something like this

# get all the businesses from the modal
b = Business.objects.all()


# loop through the all the profiles
for p in b:      
    p.facebook_link = p.facebook_link.replace('http://www.facebook.com','')
    p.facebook_link = p.facebook_link.replace('/facebook.com','/')
    p.facebook_link = p.facebook_link.replace('https://www.facebook.com','')
    p.facebook_link = p.facebook_link.replace('//','/')
    p.save()

On the signup form we do some JavaScript to parse out some of the non-sense

$('#facebook').blur(function() {
     $(this).val($(this).val().replace(/^.*\//,''))
})

$('#twitter').blur(function() {
     $(this).val($(this).val().replace(/^[@]/,''))
})

Making user logins more forgiving

We are currently working on making our login system more forgiving. We started by creating usernames, and then people forgot their usernames so we now we are wanting to use e-mail addresses as usernames. This is great except for the users who remember their username.

We decided to try logging in assuming they gave us a username, if that fails, try it again matching against their email.

While we are at it we also smush everything down to lowercase so that we can eliminate some typos. We are don't differentiate 'Bob' and 'bob'.

UPDATE table set email = LOWER(email);

How to reset Django admin password

Sometimes you just can't remember what you set it to, or like me, you restore from an SQL file that you never knew the password for. Anyway, python to the rescue.

> python manage.py shell


from django.contrib.auth.models import User

u = User.objects.all()
u=User.objects.get(username__exact=’admin’)
u.set_password(‘whatever’);
u.save()

thanks to http://coderseye.com/2007/howto-reset-the-admin-password-in-django.html and the first comment

New Job at a Startup

I have a new job as a backend developer at http://Qliqup.com

It is a young venture backed tech start-up and I am very excited.

Look forward to future posts about what I am doing there.

Control4 Training

So far the first day of training is going well. They are doing a good job explaining their market position and the direction they want to take.